vue-tabs-component自定义类
我试图在Tailwindcss中使用Vue-tabs-component。
有问题的组件是https://github.com/spatie/vue-tabs-component我已经实现了它但是当使用Tailwind的类没有样式生效时,组件似乎被绑定到类中编译。
这就是我所拥有的:
<template>
  <section class="flex h-screen w-screen uppercase shadow leading-loose">
    <section id="large-header" class="relative w-full overflow-hidden bg-cover bg-center gradient-background">
      <canvas id="demo-canvas"></canvas>

      <section class="flex flex-wrap w-full max-w-xs p-4 absolute m-0 bg-white shadow content">
        <tabs class="flex justify-center inline-flex border-b w-full pt-2">
          <tab name="signIn" class="uppercase text-grey-darker text-lg border-b border-transparent hover:border-grey-darker pb-4" style="outline:none">
            <SignIn />
          </tab>
          <span class="pr-8"></span>
          <tab name="signUp" class="uppercase text-grey-darker text-lg border-b border-transparent hover:border-grey-darker pb-4" style="outline:none">
            <SignUp />
          </tab>
        </tabs>

        <section v-if="authUser">
          <h2 class="text-5xl">Signed in as {{ authUser.email }}</h2>
          <button @click='signOut'></button>
        </section>
      </section>
    </section>
  </section>
</template>

<script>
import SignIn from '@/components/Forms/SignIn'
import SignUp from '@/components/Forms/SignUp'
import {Tabs, Tab} from 'vue-tabs-component';

export default {
  components: {
    SignIn,
    SignUp,
    Tabs,
    Tab
  },
  data: function () {
    return {
      authUser: null
    }
  },
  methods: {
    signOut () {
      firebase.auth().signOut()
    },
    created () {
      firebase.auth().onAuthStateChanged(user => { this.authUser = user })
    }
  }
}
</script>


<style scoped>
.gradient-background {
  background: #0f0c29;
  background: -webkit-linear-gradient(to right, #24243e, #302b63, #0f0c29);
  background: linear-gradient(to right, #24243e, #302b63, #0f0c29);

  /* background: #093028;
  background: -webkit-linear-gradient(to right, #237A57, #093028);
  background: linear-gradient(to right, #237A57, #093028); */
}

.content {
  -webkit-transform: translate3d(-50%, -50%, 0);
  transform: translate3d(-50%, -50%, 0);
  color: #F9F1E9;
  top: 50%;
  left: 50%;
}
</style>
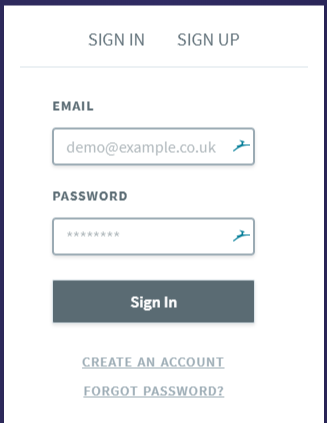
这就是我想要的最终结果
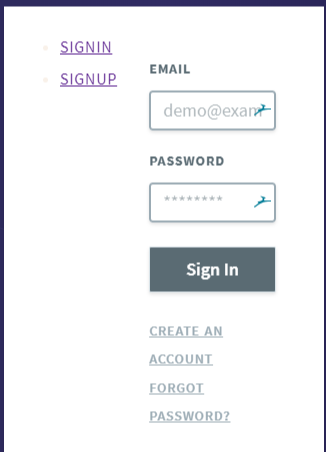
当我添加标签(上面的代码)时,我得到了这个
感谢任何帮助。
1 个答案:
答案 0 :(得分:0)
在项目中安装顺风车
:npm install tailwindcss --save-dev
在项目的根目录中创建一个tailwind.js文件:
./node_modules/.bin/tailwind init tailwind.js
创建一个main.css,其中包含:
@tailwind preflight;
@tailwind components;
@tailwind utilities;
修改package.json中的脚本以构建main.css:
"scripts": {
  "tailwind:build": "./node_modules/.bin/tailwind build ./input_path/main.css -c ./tailwind.js -o ./outputh_path/styles.css",
  "serve": "npm run tailwind:build && vue-cli-service serve",
  "build": "npm run tailwind:build && vue-cli-service build",
  "lint": "vue-cli-service lint"
}
在您的public / index.html中放置链接:
<link rel="stylesheet" href="<%= webpackConfig.output.publicPath %>output_path/styles.css" />
相关问题
最新问题
- 我写了这段代码,但我无法理解我的错误
- 我无法从一个代码实例的列表中删除 None 值,但我可以在另一个实例中。为什么它适用于一个细分市场而不适用于另一个细分市场?
- 是否有可能使 loadstring 不可能等于打印?卢阿
- java中的random.expovariate()
- Appscript 通过会议在 Google 日历中发送电子邮件和创建活动
- 为什么我的 Onclick 箭头功能在 React 中不起作用?
- 在此代码中是否有使用“this”的替代方法?
- 在 SQL Server 和 PostgreSQL 上查询,我如何从第一个表获得第二个表的可视化
- 每千个数字得到
- 更新了城市边界 KML 文件的来源?