жҲ‘иҜ•еӣҫд»Ҙзј–зЁӢж–№ејҸи°ғж•ҙеӣҫеғҸеӨ§е°Ҹд»ҘйҖӮеә”еұҸ幕зҡ„еӨ§е°ҸпјҢдҪҶжҳҜеҪ“жҲ‘жһ„е»әеә”з”Ёж—¶пјҢеӣҫеғҸз”ҡиҮіж— жі•жҳҫзӨәгҖӮжҲ‘еҸӘзңӢеҲ°дёҖдёӘз©әзҷҪзҡ„еұҸ幕пјҢжңүи°ҒзҹҘйҒ“жҲ‘еҒҡй”ҷдәҶд»Җд№Ҳпјҹ
иҝҷжҳҜжҲ‘зҡ„д»Јз ҒпјҲд»Һе…¶д»–дёҖдәӣзәҝзЁӢдёӯдәҶи§ЈеҲ°и°ғж•ҙеӣҫеғҸеӨ§е°Ҹпјүпјҡ
class ViewControllerSport: UIViewController {

@IBOutlet weak var FotoSport: UIImageView!

let screen = UIScreen.mainScreen().bounds


override func viewDidLoad() {
    super.viewDidLoad()

    FotoSport.frame = CGRect(x: 20, y: 20, width: screen.width * 0.5, height: screen.width * 0.5)
    FotoSport.image = UIImage(named: "Blokker")


}
зӯ”жЎҲ 0 :(еҫ—еҲҶпјҡ2)
д»ҘдёӢеҠҹиғҪи°ғж•ҙеӣҫеғҸеӨ§е°ҸгҖӮе®ғйңҖиҰҒдёӨдёӘеҸӮж•°пјҡеӣҫеғҸе’ҢжүҖйңҖзҡ„еӨ§е°ҸгҖӮ
func ResizeImage(image: UIImage, targetSize: CGSize) -> UIImage {
    let size = image.size

    let widthRatio  = targetSize.width  / image.size.width
    let heightRatio = targetSize.height / image.size.height

    // Figure out what our orientation is, and use that to form the rectangle
    var newSize: CGSize
    if(widthRatio > heightRatio) {
        newSize = CGSizeMake(size.width * heightRatio, size.height * heightRatio)
    } else {
        newSize = CGSizeMake(size.width * widthRatio,  size.height * widthRatio)
    }

    // This is the rect that we've calculated out and this is what is actually used below
    let rect = CGRectMake(0, 0, newSize.width, newSize.height)

    // Actually do the resizing to the rect using the ImageContext stuff
    UIGraphicsBeginImageContextWithOptions(newSize, false, 1.0)
    image.drawInRect(rect)
    let newImage = UIGraphicsGetImageFromCurrentImageContext()
    UIGraphicsEndImageContext()

    return newImage
}
з”Ёжі•пјҡ
self.ResizeImage(UIImage(named: "MyImage.png")!, targetSize: CGSizeMake(320.0, 700.0))
еҸӮиҖғй“ҫжҺҘ:: Resize image
Swift 3.0пјҡ
func ResizeImage(_ image: UIImage, targetSize: CGSize) -> UIImage? {
    let size = image.size

    let widthRatio  = targetSize.width  / image.size.width
    let heightRatio = targetSize.height / image.size.height

    // Figure out what our orientation is, and use that to form the rectangle
    var newSize: CGSize
    if(widthRatio > heightRatio) {
        newSize = CGSize(width: size.width * heightRatio, height: size.height * heightRatio)
    } else {
        newSize = CGSize(width: size.width * widthRatio, height: size.height * widthRatio)
    }

    // This is the rect that we've calculated out and this is what is actually used below
    let rect = CGRect(x: 0, y: 0, width: newSize.width, height: newSize.height)

    // Actually do the resizing to the rect using the ImageContext stuff
    UIGraphicsBeginImageContextWithOptions(newSize, false, 1.0)
    image.draw(in: rect)
    let newImage = UIGraphicsGetImageFromCurrentImageContext()
    UIGraphicsEndImageContext()

    return newImage
}
з”Ёжі•пјҡ
self.ResizeImage(UIImage(named: "MyImage.png")!, targetSize: CGSize(width: 320.0, height: 700.0))
зӯ”жЎҲ 1 :(еҫ—еҲҶпјҡ1)
йҰ–е…ҲпјҢжЈҖжҹҘUIImage(named: "Blokker")жҳҜеҗҰжӯЈеңЁиҝ”еӣһеӣҫеғҸжҲ–дёәйӣ¶гҖӮ
еҰӮжһңе®ғиҝ”еӣһеӣҫеғҸпјҢдёәдәҶеңЁUIImageViewдёӯзј©ж”ҫеӣҫеғҸпјҢжӮЁеҸҜд»ҘдҪҝз”Ёд»ҘдёӢж–№жі•д№ӢдёҖпјҡ
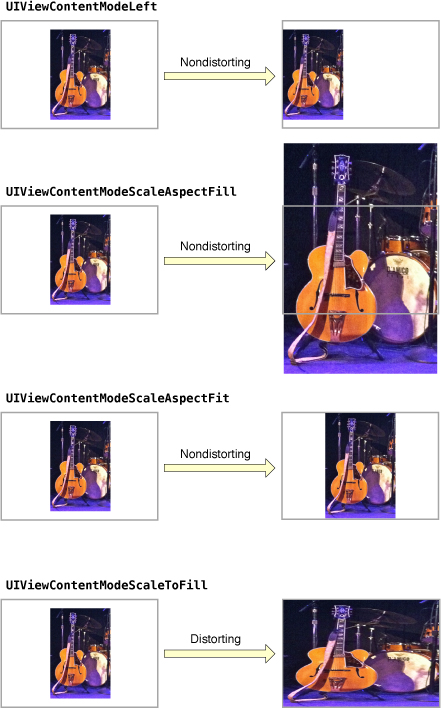
UIViewContentModeScaleToFill;
UIViewContentModeScaleAspectFit;
UIViewContentModeScaleAspectFill;
ScaleToFillеҸӘжҳҜзј©ж”ҫеӣҫеғҸгҖӮ
AspectFitе’ҢAspectFillзј©ж”ҫеӣҫеғҸпјҢдҝқз•ҷе®ғзҡ„е®Ҫй«ҳжҜ”гҖӮ
йҖӮеҗҲе°Ҷзј©ж”ҫеӣҫеғҸпјҢзӣҙеҲ°е…ЁйғЁжҳҫзӨәгҖӮеЎ«е……е°Ҷзј©ж”ҫеӣҫеғҸпјҢзӣҙеҲ°е…¶дёӯдёҖдёӘиҫ№зӯүдәҺUIImageViewиҫ№д№ӢдёҖгҖӮ