如何在Xamarin.Forms中登录facebook
我想制作一个针对iOs,Android和Windows Phone的Xamarin.Forms项目。
我的应用需要使用Facebook对用户进行身份验证。
我应该单独为每个平台实施登录,还是使用手动流程? https://developers.facebook.com/docs/facebook-login/manually-build-a-login-flow/v2.0
我更喜欢单一的登录流程实现,并在所有平台上使用它。
如何获得facebook登录流程的单一实现?
7 个答案:
答案 0 :(得分:102)
更新(10/24/17):虽然几年前这种做事方式还可以,但我现在强烈主张使用本机UI进行身份验证,而不是使用webview方法这里显示。 Auth0是使用各种身份提供程序为您的应用程序完成本机UI登录的好方法: https://auth0.com/docs/quickstart/native/xamarin
编辑:我最后放了sample for this on Gihub
我发了一个答案on the Xamarin Forums.我将在这里重复一遍。
让我们从应用程序的核心开始,即 Xamarin.Forms PCL项目。您的App课程将如下所示:
namespace OAuth2Demo.XForms
{
    public class App
    {
        static NavigationPage _NavPage;

        public static Page GetMainPage ()
        {
            var profilePage = new ProfilePage();

            _NavPage = new NavigationPage(profilePage);

            return _NavPage;
        }

        public static bool IsLoggedIn {
            get { return !string.IsNullOrWhiteSpace(_Token); }
        }

        static string _Token;
        public static string Token {
            get { return _Token; }
        }

        public static void SaveToken(string token)
        {
            _Token = token;
        }

        public static Action SuccessfulLoginAction
        {
            get {
                return new Action (() => {
                    _NavPage.Navigation.PopModalAsync();
                });
            }
        }
    }
}
首先要注意的是GetMainPage()方法。这告诉app应该在启动时首先加载哪个屏幕。
我们还有一个简单的属性和方法,用于存储从auth服务返回的Token,以及一个简单的IsLoggedIn属性。
还有一个Action属性;我在这里停留的东西是为了让平台实现能够执行Xamarin.Forms导航操作。稍后会详细介绍。
您还会在IDE中注意到一些红色,因为我们还没有创建ProfilePage课程。所以,让我们这样做。
在 Xamarin.Forms PCL项目中创建一个非常简单的ProfilePage类。我们甚至不会对它做任何想象,因为这取决于你的特殊需要。为了简化本示例,它将包含一个标签:
namespace OAuth2Demo.XForms
{
    public class ProfilePage : BaseContentPage
    {
        public ProfilePage ()
        {
            Content = new Label () {
                Text = "Profile Page",
                VerticalOptions = LayoutOptions.CenterAndExpand,
                HorizontalOptions = LayoutOptions.CenterAndExpand,
            };
        }
    }
}
同样,您的IDE中可能会有一些红色,因为我们似乎错过了BaseContentPage类。 BaseContentPage课程的唯一目的是确保在用户登录之前不会显示任何应用程序的屏幕。(在这个简化的演示中,我们只是坚持用户信息到内存,因此您每次运行应用程序时都需要重新登录。在真实应用程序中,您需要将经过身份验证的用户信息存储到设备的钥匙串中,这将消除在每个应用程序启动时登录的需要。)
在 Xamarin.Forms PCL项目中创建BaseContentPage课程:
namespace OAuth2Demo.XForms
{
    public class BaseContentPage : ContentPage
    {
        protected override void OnAppearing ()
        {
            base.OnAppearing ();

            if (!App.IsLoggedIn) {
                Navigation.PushModalAsync(new LoginPage());
            }
        }
    }
}
这里有一些有趣的事情:
-
我们重写了
OnAppearing()方法,类似于iOS UIViewController中的ViewWillAppear方法。您可以在此处执行任何您希望在屏幕出现之前立即运行的代码。 -
我们在此方法中唯一要做的就是检查用户是否已登录。如果他们没有登录,那么我们会执行模式推送到一个名为
LoginPage的班级。如果您不熟悉模态的概念,那么它只是一个视图,它将用户从正常的应用程序流中移出来执行某些特殊任务;在我们的例子中,要执行登录。 -
顶部的
[assembly: ExportRenderer (typeof (LoginPage), typeof (LoginPageRenderer))]行(重要的是之前命名空间声明)正在使用Xamarin.Forms DependencyService。它不是世界上最美丽的东西,因为它不是IoC / DI,但无论如何......它都有效。这是"映射"我们的LoginPageRenderer到LoginPage。 -
这是我们实际使用Xamarin.Auth组件的类。这是
OAuth2Authenticator引用的来源。 -
登录成功后,我们会通过
App.SuccessfulLoginAction.Invoke();启动Xamarin.Forms导航。这会让我们回到ProfilePage。 -
由于我们在iOS上,我们正在执行
ViewDidAppear()方法的所有逻辑错误。 -
顶部的
[assembly: ExportRenderer (typeof (LoginPage), typeof (LoginPageRenderer))]行(重要的是之前命名空间声明)正在使用Xamarin.Forms DependencyService。这与LoginPageRenderer的iOS版本没有区别。 -
同样,这是我们实际使用Xamarin.Auth组件的地方。这是
OAuth2Authenticator引用的来源。 -
与iOS版本一样,登录成功后,我们会通过
App.SuccessfulLoginAction.Invoke();启动Xamarin.Forms导航。这会让我们回到ProfilePage。 -
与iOS版本不同,我们执行
OnModelChanged()方法内的所有逻辑,而不是ViewDidAppear()。
所以,让我们在 Xamarin.Forms PCL项目中创建LoginPage类:
namespace OAuth2Demo.XForms
{
    public class LoginPage : ContentPage
    {

    }
}
等等......为什么这个班级没有一个人?
由于我们正在使用Xamatin.Auth组件(它负责构建和呈现与提供的OAuth2信息一起使用的Web视图),我们实际上并不希望在我们的任何实现中使用LoginPage课程。我知道这看起来很奇怪,但请耐心等待。
适用于iOS的LoginPageRenderer
到目前为止,我们一直只在 Xamarin.Forms PCL项目中工作。但现在我们需要在iOS项目中提供我们LoginPage的特定于平台的实现。这就是渲染器的概念所在。
在Xamarin.Forms中,当您想要提供特定于平台的屏幕和控件(即不从Xamarin.Forms PCL项目中的抽象页面派生其内容的屏幕)时,您可以使用 Renderers < /强>
在 iOS平台项目中创建LoginPageRenderer课程:
[assembly: ExportRenderer (typeof (LoginPage), typeof (LoginPageRenderer))]

namespace OAuth2Demo.XForms.iOS
{
    public class LoginPageRenderer : PageRenderer
    {
        public override void ViewDidAppear (bool animated)
        {
            base.ViewDidAppear (animated);

            var auth = new OAuth2Authenticator (
                clientId: "", // your OAuth2 client id
                scope: "", // the scopes for the particular API you're accessing, delimited by "+" symbols
                authorizeUrl: new Uri (""), // the auth URL for the service
                redirectUrl: new Uri ("")); // the redirect URL for the service

            auth.Completed += (sender, eventArgs) => {
            // We presented the UI, so it's up to us to dimiss it on iOS.
            App.SuccessfulLoginAction.Invoke();

            if (eventArgs.IsAuthenticated) {
                // Use eventArgs.Account to do wonderful things
                App.SaveToken(eventArgs.Account.Properties["access_token"]);
            } else {
                // The user cancelled
            }
        };

        PresentViewController (auth.GetUI (), true, null);
            }
        }
    }
}
有一些重要的事情需要注意:
适用于Android的LoginPageRenderer
在 Android平台项目中创建LoginPageRenderer课程。 (请注意,您创建的类名与iOS项目中的类名相同,但在Android项目中,PageRenderer继承自Android类而非iOS类。)
[assembly: ExportRenderer (typeof (LoginPage), typeof (LoginPageRenderer))]

namespace OAuth2Demo.XForms.Android
{
    public class LoginPageRenderer : PageRenderer
    {
        protected override void OnModelChanged (VisualElement oldModel, VisualElement newModel)
        {
            base.OnModelChanged (oldModel, newModel);

            // this is a ViewGroup - so should be able to load an AXML file and FindView<>
            var activity = this.Context as Activity;

            var auth = new OAuth2Authenticator (
                clientId: "", // your OAuth2 client id
                scope: "", // the scopes for the particular API you're accessing, delimited by "+" symbols
                authorizeUrl: new Uri (""), // the auth URL for the service
                redirectUrl: new Uri ("")); // the redirect URL for the service

            auth.Completed += (sender, eventArgs) => {
            if (eventArgs.IsAuthenticated) {
                App.SuccessfulLoginAction.Invoke();
                // Use eventArgs.Account to do wonderful things
                App.SaveToken(eventArgs.Account.Properties["access_token"]);
            } else {
                // The user cancelled
            }
        };

        activity.StartActivity (auth.GetUI(activity));
        }
    }
}
再次,让我们来看看一些有趣的事情:
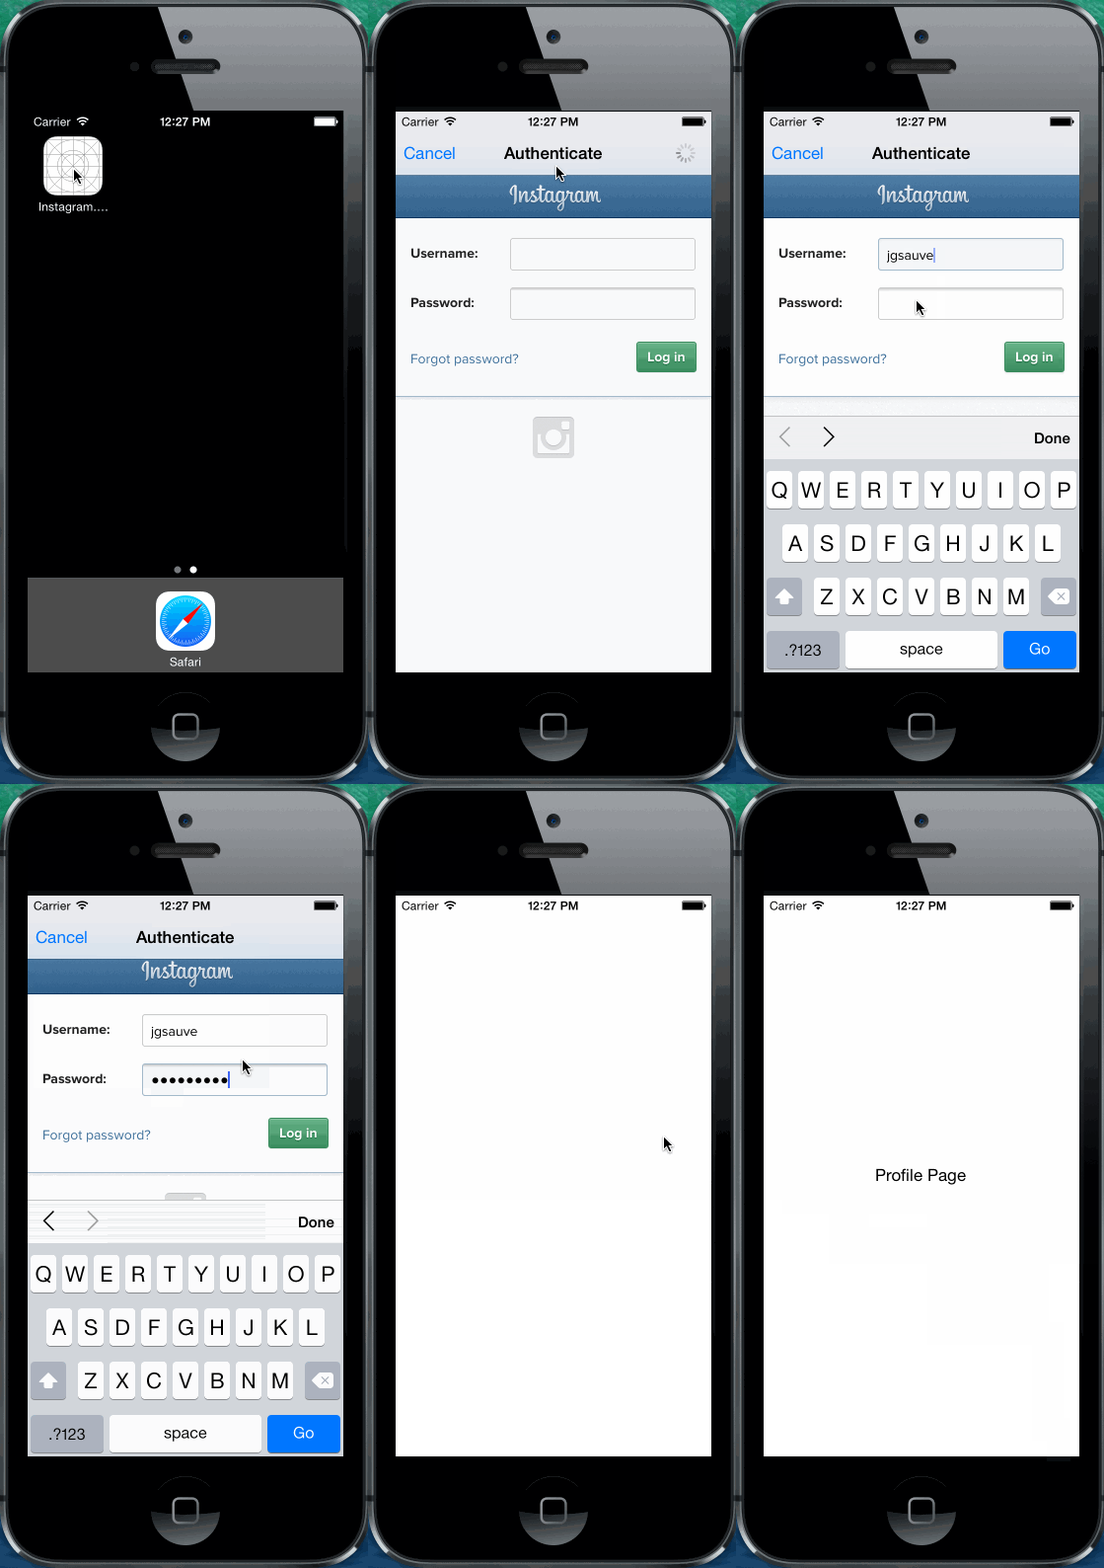
这是在iOS上:

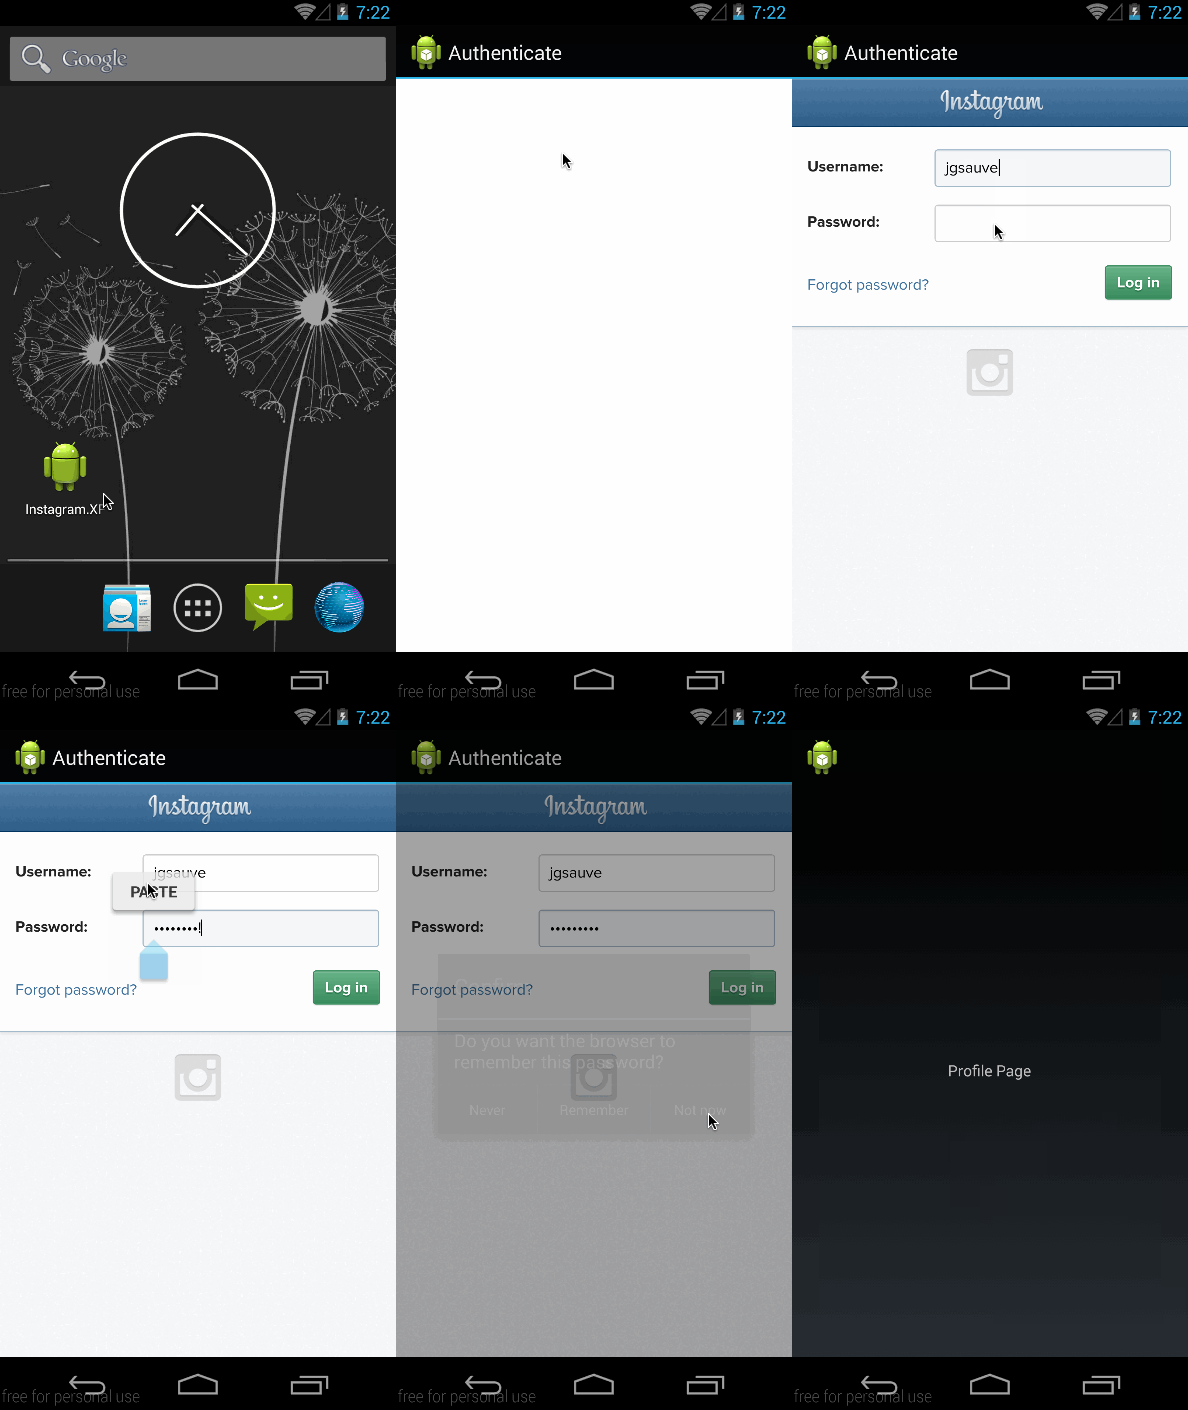
...和Android:

<强>更新 我还在我的博客上提供了详细的示例:http://www.joesauve.com/using-xamarin-auth-with-xamarin-forms/
答案 1 :(得分:20)
您可以使用Xamarin.Social或Xamarin.Auth。无论平台是什么,它都允许使用相同的api。
截至目前,这些lib还不是PCL,但您仍然可以从共享资产项目中使用它们,或者在界面中抽象您需要的API并使用DependencyService或任何其他DI容器。
答案 2 :(得分:9)
我创建了一个示例项目来展示如何使用原生Facebook组件创建Facebook登录,而不是通过像这里建议的解决方案那样的网络视图。 你可以在这个地址看看:
答案 3 :(得分:5)
IOS 8 :对于那些使用@NovaJoe代码并且仍然停留在视图中的人,请将代码添加到解决方法中:
 bool hasShown;

    public override void ViewDidAppear(bool animated)
    {
        if (!hasShown)
        {
            hasShown = true;

            // the rest of @novaJoe code
        }

    }
答案 4 :(得分:3)
这是一个很好的Xamarin.Forms身份验证示例。代码中的文档很好。它使用webview呈现登录屏幕,但您可以选择所需的登录类型。它还保存了用户令牌,因此他不必重新登录。
答案 5 :(得分:0)
@ NovaJoe的代码的另一个补充,在iOS8上使用Facebook,你需要修改Renderer类,如下所示,在成功验证后关闭View。
auth.Completed += (sender, eventArgs) => {
            // We presented the UI, so it's up to us to dimiss it on iOS.
/ *导入并添加此行* /
DismissViewController (true, null);
/ * * /
            if (eventArgs.IsAuthenticated) {
                App.Instance.SuccessfulLoginAction.Invoke ();

                // Use eventArgs.Account to do wonderful things
                App.Instance.SaveToken (eventArgs.Account.Properties ["access_token"]);


            } else {
                // The user cancelled
            }
        };
答案 6 :(得分:0)
Androids PageRenderer的正确实现是:
using System;
using Android.App;
using Android.Content;
using OAuth2Demo.XForms.Android;
using Xamarin.Auth;
using Xamarin.Forms;
using Xamarin.Forms.Platform.Android;
using XamarinAuth;

[assembly: ExportRenderer(typeof(LoginPage), typeof(LoginPageRenderer))]

namespace OAuth2Demo.XForms.Android
{
    public class LoginPageRenderer : PageRenderer
    {
        public LoginPageRenderer(Context context) : base(context) { }

        protected override void OnElementChanged(ElementChangedEventArgs<Page> e)
        {
            base.OnElementChanged(e);

            // this is a ViewGroup - so should be able to load an AXML file and FindView<>
            var activity = this.Context as Activity;

            var auth = new OAuth2Authenticator(
                clientId: "<Constants.clientId>", // your OAuth2 client id
                scope: "<Constants.scope>", // the scopes for the particular API you're accessing, delimited by "+" symbols
                authorizeUrl: new Uri("<Constants.authorizeUrl>"), // the auth URL for the service
                redirectUrl: new Uri("<Constants.redirectUrl>")); // the redirect URL for the service

            auth.Completed += (sender, eventArgs) =>
            {
                if (eventArgs.IsAuthenticated)
                {
                    App.SuccessfulLoginAction.Invoke();
                    // Use eventArgs.Account to do wonderful things
                    App.SaveToken(eventArgs.Account.Properties["access_token"]);
                }
                else
                {
                    // The user cancelled
                }
            };

            activity.StartActivity(auth.GetUI(activity));
        }
    }
}
- 如何在Xamarin.Forms中登录facebook
- 如何使用xamarin.auth登录并使用xamarin表单获取用户的个人资料信息
- 在没有登录的情况下在跨平台应用中显示Facebook Feed
- Xamarin.Forms OAuth / Facebook SDK登录
- Xamarin.Auth无法使用Google登录[Xamarin.Forms]
- 如何在Xamarin.Form中存储用户登录凭据
- 如何使用mvvm以xamarin形式创建登录页面
- 如何在Xamarin.Forms中管理Facebook登录以避免频繁进行身份验证?
- 如果我们尝试多次登录,则Facebook登录会使您被带到“帮助中心”
- 以xamarin形式登录Facebook
- 我写了这段代码,但我无法理解我的错误
- 我无法从一个代码实例的列表中删除 None 值,但我可以在另一个实例中。为什么它适用于一个细分市场而不适用于另一个细分市场?
- 是否有可能使 loadstring 不可能等于打印?卢阿
- java中的random.expovariate()
- Appscript 通过会议在 Google 日历中发送电子邮件和创建活动
- 为什么我的 Onclick 箭头功能在 React 中不起作用?
- 在此代码中是否有使用“this”的替代方法?
- 在 SQL Server 和 PostgreSQL 上查询,我如何从第一个表获得第二个表的可视化
- 每千个数字得到
- 更新了城市边界 KML 文件的来源?