如何在ShowMessage中显示表?
我正在尝试使用ShowMessage显示一个如下所示的表:
short            | Description for "short"
verylongtext     | Description for "verylongtext"
如何在简单的消息对话框中获得两个正确对齐的列?
我尝试使用空格对齐列,但ShowMessage的字体是可变的。然后我尝试使用制表符对齐它们,但我不知道如何计算每行的正确制表符数。
是否有可靠的方法来计算标签数?
PS:我想避免为此目的编写自定义对话框。
4 个答案:
答案 0 :(得分:8)
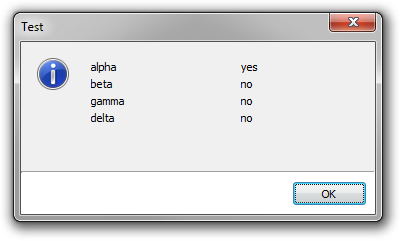
您也可以在自定义对话框中使用列表视图。

尝试
type StringArray = array of string;

procedure ShowMemoMessage(AOwner: TForm; const Caption: string; Col1, Col2: StringArray; const DialogType: TMsgDlgType = mtInformation; const DlgWidth: integer = 360; const DlgHeight: integer = 200);
var
  dlg: TForm;
  lv: TListView;
  btn: TButton;
  IconType: PChar;
  icon: HICON;
  image: TImage;
  sh: TShape;
  bvl: TBevel;
  i: Integer;
begin

  if length(Col1) <> length(Col2) then
    raise Exception.Create('The length of the columns doesn''t match.');

  dlg := TForm.Create(AOwner);
  try
    dlg.BorderStyle := bsDialog;
    dlg.Caption := Caption;
    dlg.Width := DlgWidth;
    dlg.Height := DlgHeight;
    dlg.Position := poScreenCenter;
    btn := TButton.Create(dlg);
    btn.Parent := dlg;
    btn.Caption := 'OK';
    btn.ModalResult := mrOk;
    btn.Left := dlg.ClientWidth - btn.Width - 8;
    btn.Top := dlg.ClientHeight - btn.Height - 8;
    lv := TListView.Create(dlg);
    lv.Parent := dlg;
    lv.Color := dlg.Color;
    lv.ReadOnly := true;
    lv.BorderStyle := bsNone;
    lv.Left := 8;
    lv.Top := 8;
    lv.Width := dlg.ClientWidth - 16;
    lv.Height := dlg.ClientHeight - 16 - 8 - 4 - btn.Height;
    lv.ViewStyle := vsReport;
    lv.RowSelect := true;
    with lv.Columns.Add do
    begin
      Caption := 'Name';
      Width := 150;
    end;
    lv.Columns.Add.Caption := 'Value';
    lv.ShowColumnHeaders := false;

    for i := 0 to high(Col1) do
      with lv.Items.Add do
      begin
        Caption := Col1[i];
        SubItems.Add(Col2[i]);
      end;

    sh := TShape.Create(dlg);
    sh.Parent := dlg;
    sh.Align := alBottom;
    sh.Shape := stRectangle;
    sh.Pen.Color := clWhite;
    sh.Brush.Color := clWhite;
    sh.Height := btn.Height + 16;

    bvl := TBevel.Create(dlg);
    bvl.Parent := dlg;
    bvl.Align := alBottom;
    bvl.Height := 2;
    bvl.Style := bsLowered;

    case DialogType of
      mtWarning:
        begin
          MessageBeep(MB_ICONWARNING);
          IconType := IDI_WARNING;
        end;
      mtError:
        begin
          MessageBeep(MB_ICONERROR);
          IconType := IDI_ERROR;
        end;
      mtInformation:
        begin
          MessageBeep(MB_ICONINFORMATION);
          IconType := IDI_INFORMATION;
        end;
      mtConfirmation:
        begin
          MessageBeep(MB_ICONQUESTION);
          IconType := IDI_QUESTION;
        end;
      mtCustom: {silence};
    end;

    if DialogType <> mtCustom then
    begin
      image := TImage.Create(dlg);
      image.Parent := dlg;
      icon := LoadIcon(0, IconType);
      image.AutoSize := true;
      image.Picture.Icon.Handle := icon;
      image.Left := 16;
      image.Top := 16;
      lv.Left := image.Width + 32;
      lv.Top := 16;
      lv.Height := lv.Height - 8;
    end;

    dlg.ShowModal;
  finally
    dlg.Free;
  end;
end;
然后只需将其称为
procedure TForm1.FormCreate(Sender: TObject);
var
  col1, col2: StringArray;
begin

  SetLength(col1, 4);
  col1[0] := 'alpha'; col1[1] := 'beta'; col1[2] := 'gamma'; col1[3] := 'delta';

  SetLength(col2, 4);
  col2[0] := 'yes'; col2[1] := 'no'; col2[2] := 'no'; col2[3] := 'no';

  ShowMemoMessage(Self, 'Test', col1, col2);

end;
这样可以保证列保持对齐,您不必担心制表位。

鼠标悬停:

答案 1 :(得分:6)
如果您没有为此编写自定义对话框,您何时会这样做?这并不难。只需创建一个表单,在其上放一个TMemo并只读取该备忘录。您可以设置像Courier New这样的等宽字体,问题就解决了。你也可以获得滚动条和选择的优势,你可以选择使它成为非模态的。
我甚至建议在网格(如TStringGrid)中显示此类数据,而不是备忘录或标签。
计算如何在消息框中显示此文本需要更多工作,而不仅仅是创建自定义对话框。
答案 2 :(得分:1)
刚创建了一个显示如下弹出窗口的内容:

只需调用以下过程,并添加TStringList作为参数。 当然你可以通过使用TListView,图标,滚动条等来实现这个。
将它放在一个单独的单元中,您将始终能够轻松地显示这样的内容。
uses ..., StdCtrls, ExtCtrls;


procedure ShowTablePopup(SL:TStringList);
var
  LButtonOK: TButton;
  LMemo: TMemo;
  LPanel: TPanel;
  LForm: TForm;
begin
  LForm := TForm.Create(Application);
  LMemo := TMemo.Create(LForm);
  LPanel := TPanel.Create(LForm);
  LButtonOK := TButton.Create(LForm);

  LForm.Left := 0;
  LForm.Top := 0;
  LForm.Caption := 'Values';
  LForm.ClientHeight := 250;
  LForm.ClientWidth := 400;

  LMemo.Parent := LForm;
  LMemo.AlignWithMargins := True;
  LMemo.Left := 3;
  LMemo.Top := 3;
  LMemo.Width := 295;
  LMemo.Height := 226;
  LMemo.Align := alClient;
  LMemo.Font.Name := 'Courier New';
  LMemo.Lines.Assign(SL);

  LPanel.Parent := LForm;
  LPanel.Caption := '';
  LPanel.Left := 0;
  LPanel.Top := 232;
  LPanel.Width := 301;
  LPanel.Height := 37;
  LPanel.Align := alBottom;
  LPanel.BevelOuter := bvNone;

  LButtonOK.Parent := LPanel;
  LButtonOK.AlignWithMargins := True;
  LButtonOK.Left := 223;
  LButtonOK.Top := 3;
  LButtonOK.Width := 75;
  LButtonOK.Height := 31;
  LButtonOK.Align := alRight;
  LButtonOK.Caption := '&OK';
  LButtonOK.ModalResult := mrOk;
  LButtonOK.Default := True;

  LForm.ShowModal;
end;
如何使用它的示例:
var
  SL:TStringList;
begin
  SL := TStringList.Create;
  try
    SL.Add('short            | Description for "short"');
    SL.Add('verylongtext     | Description for "verylongtext"');
    ShowTablePopup(SL);
  finally
    SL.Free;
  end;
end;
答案 3 :(得分:0)
为了完整起见,我给出了一个如何构建自定义对话框的简单示例:
procedure ShowMemoMessage(AOwner: TForm; const Caption, Text: string; const DialogType: TMsgDlgType = mtInformation; const DlgWidth: integer = 360; const DlgHeight: integer = 200);
var
  dlg: TForm;
  re: TRichEdit;
  btn: TButton;
  IconType: PChar;
  icon: HICON;
  image: TImage;
  sh: TShape;
  bvl: TBevel;
begin
  dlg := TForm.Create(AOwner);
  try
    dlg.BorderStyle := bsDialog;
    dlg.Caption := Caption;
    dlg.Width := DlgWidth;
    dlg.Height := DlgHeight;
    dlg.Position := poScreenCenter;
    btn := TButton.Create(dlg);
    btn.Parent := dlg;
    btn.Caption := 'OK';
    btn.ModalResult := mrOk;
    btn.Left := dlg.ClientWidth - btn.Width - 8;
    btn.Top := dlg.ClientHeight - btn.Height - 8;
    re := TRichEdit.Create(dlg);
    re.Parent := dlg;
    re.Color := dlg.Color;
    re.ReadOnly := true;
    re.BorderStyle := bsNone;
    re.Left := 8;
    re.Top := 8;
    re.Width := dlg.ClientWidth - 16;
    re.Height := dlg.ClientHeight - 16 - 8 - 4 - btn.Height;
    re.Lines.Text := Text;

    sh := TShape.Create(dlg);
    sh.Parent := dlg;
    sh.Align := alBottom;
    sh.Shape := stRectangle;
    sh.Pen.Color := clWhite;
    sh.Brush.Color := clWhite;
    sh.Height := btn.Height + 16;

    bvl := TBevel.Create(dlg);
    bvl.Parent := dlg;
    bvl.Align := alBottom;
    bvl.Height := 2;
    bvl.Style := bsLowered;

    case DialogType of
      mtWarning:
        begin
          MessageBeep(MB_ICONWARNING);
          IconType := IDI_WARNING;
        end;
      mtError:
        begin
          MessageBeep(MB_ICONERROR);
          IconType := IDI_ERROR;
        end;
      mtInformation:
        begin
          MessageBeep(MB_ICONINFORMATION);
          IconType := IDI_INFORMATION;
        end;
      mtConfirmation:
        begin
          MessageBeep(MB_ICONQUESTION);
          IconType := IDI_QUESTION;
        end;
      mtCustom: {silence};
    end;

    if DialogType <> mtCustom then
    begin
      image := TImage.Create(dlg);
      image.Parent := dlg;
      icon := LoadIcon(0, IconType);
      image.AutoSize := true;
      image.Picture.Icon.Handle := icon;
      image.Left := 16;
      image.Top := 16;
      re.Left := image.Width + 32;
      re.Top := 16;
      re.Height := re.Height - 8;
    end;

    dlg.ShowModal;
  finally
    dlg.Free;
  end;
end;
样本用法:
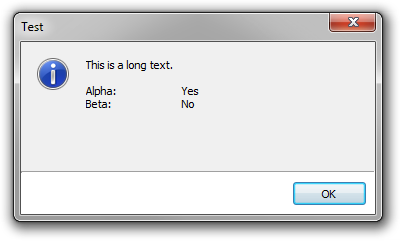
ShowMemoMessage(Self, 'Test', 'This is a long text.'#13#10#13#10'Alpha:'#9#9'Yes'#13#10'Beta:'#9#9'No');

它看起来并不完美,但它是一个开始。也许
相关问题
最新问题
- 我写了这段代码,但我无法理解我的错误
- 我无法从一个代码实例的列表中删除 None 值,但我可以在另一个实例中。为什么它适用于一个细分市场而不适用于另一个细分市场?
- 是否有可能使 loadstring 不可能等于打印?卢阿
- java中的random.expovariate()
- Appscript 通过会议在 Google 日历中发送电子邮件和创建活动
- 为什么我的 Onclick 箭头功能在 React 中不起作用?
- 在此代码中是否有使用“this”的替代方法?
- 在 SQL Server 和 PostgreSQL 上查询,我如何从第一个表获得第二个表的可视化
- 每千个数字得到
- 更新了城市边界 KML 文件的来源?