我当时使用的是https://github.com/MaybeShewill-CV/lanenet-lane-detection中的代码,该代码通过深度学习来检测道路线。
我成功测试了模型。现在,我想根据自己的数据重新训练模型。
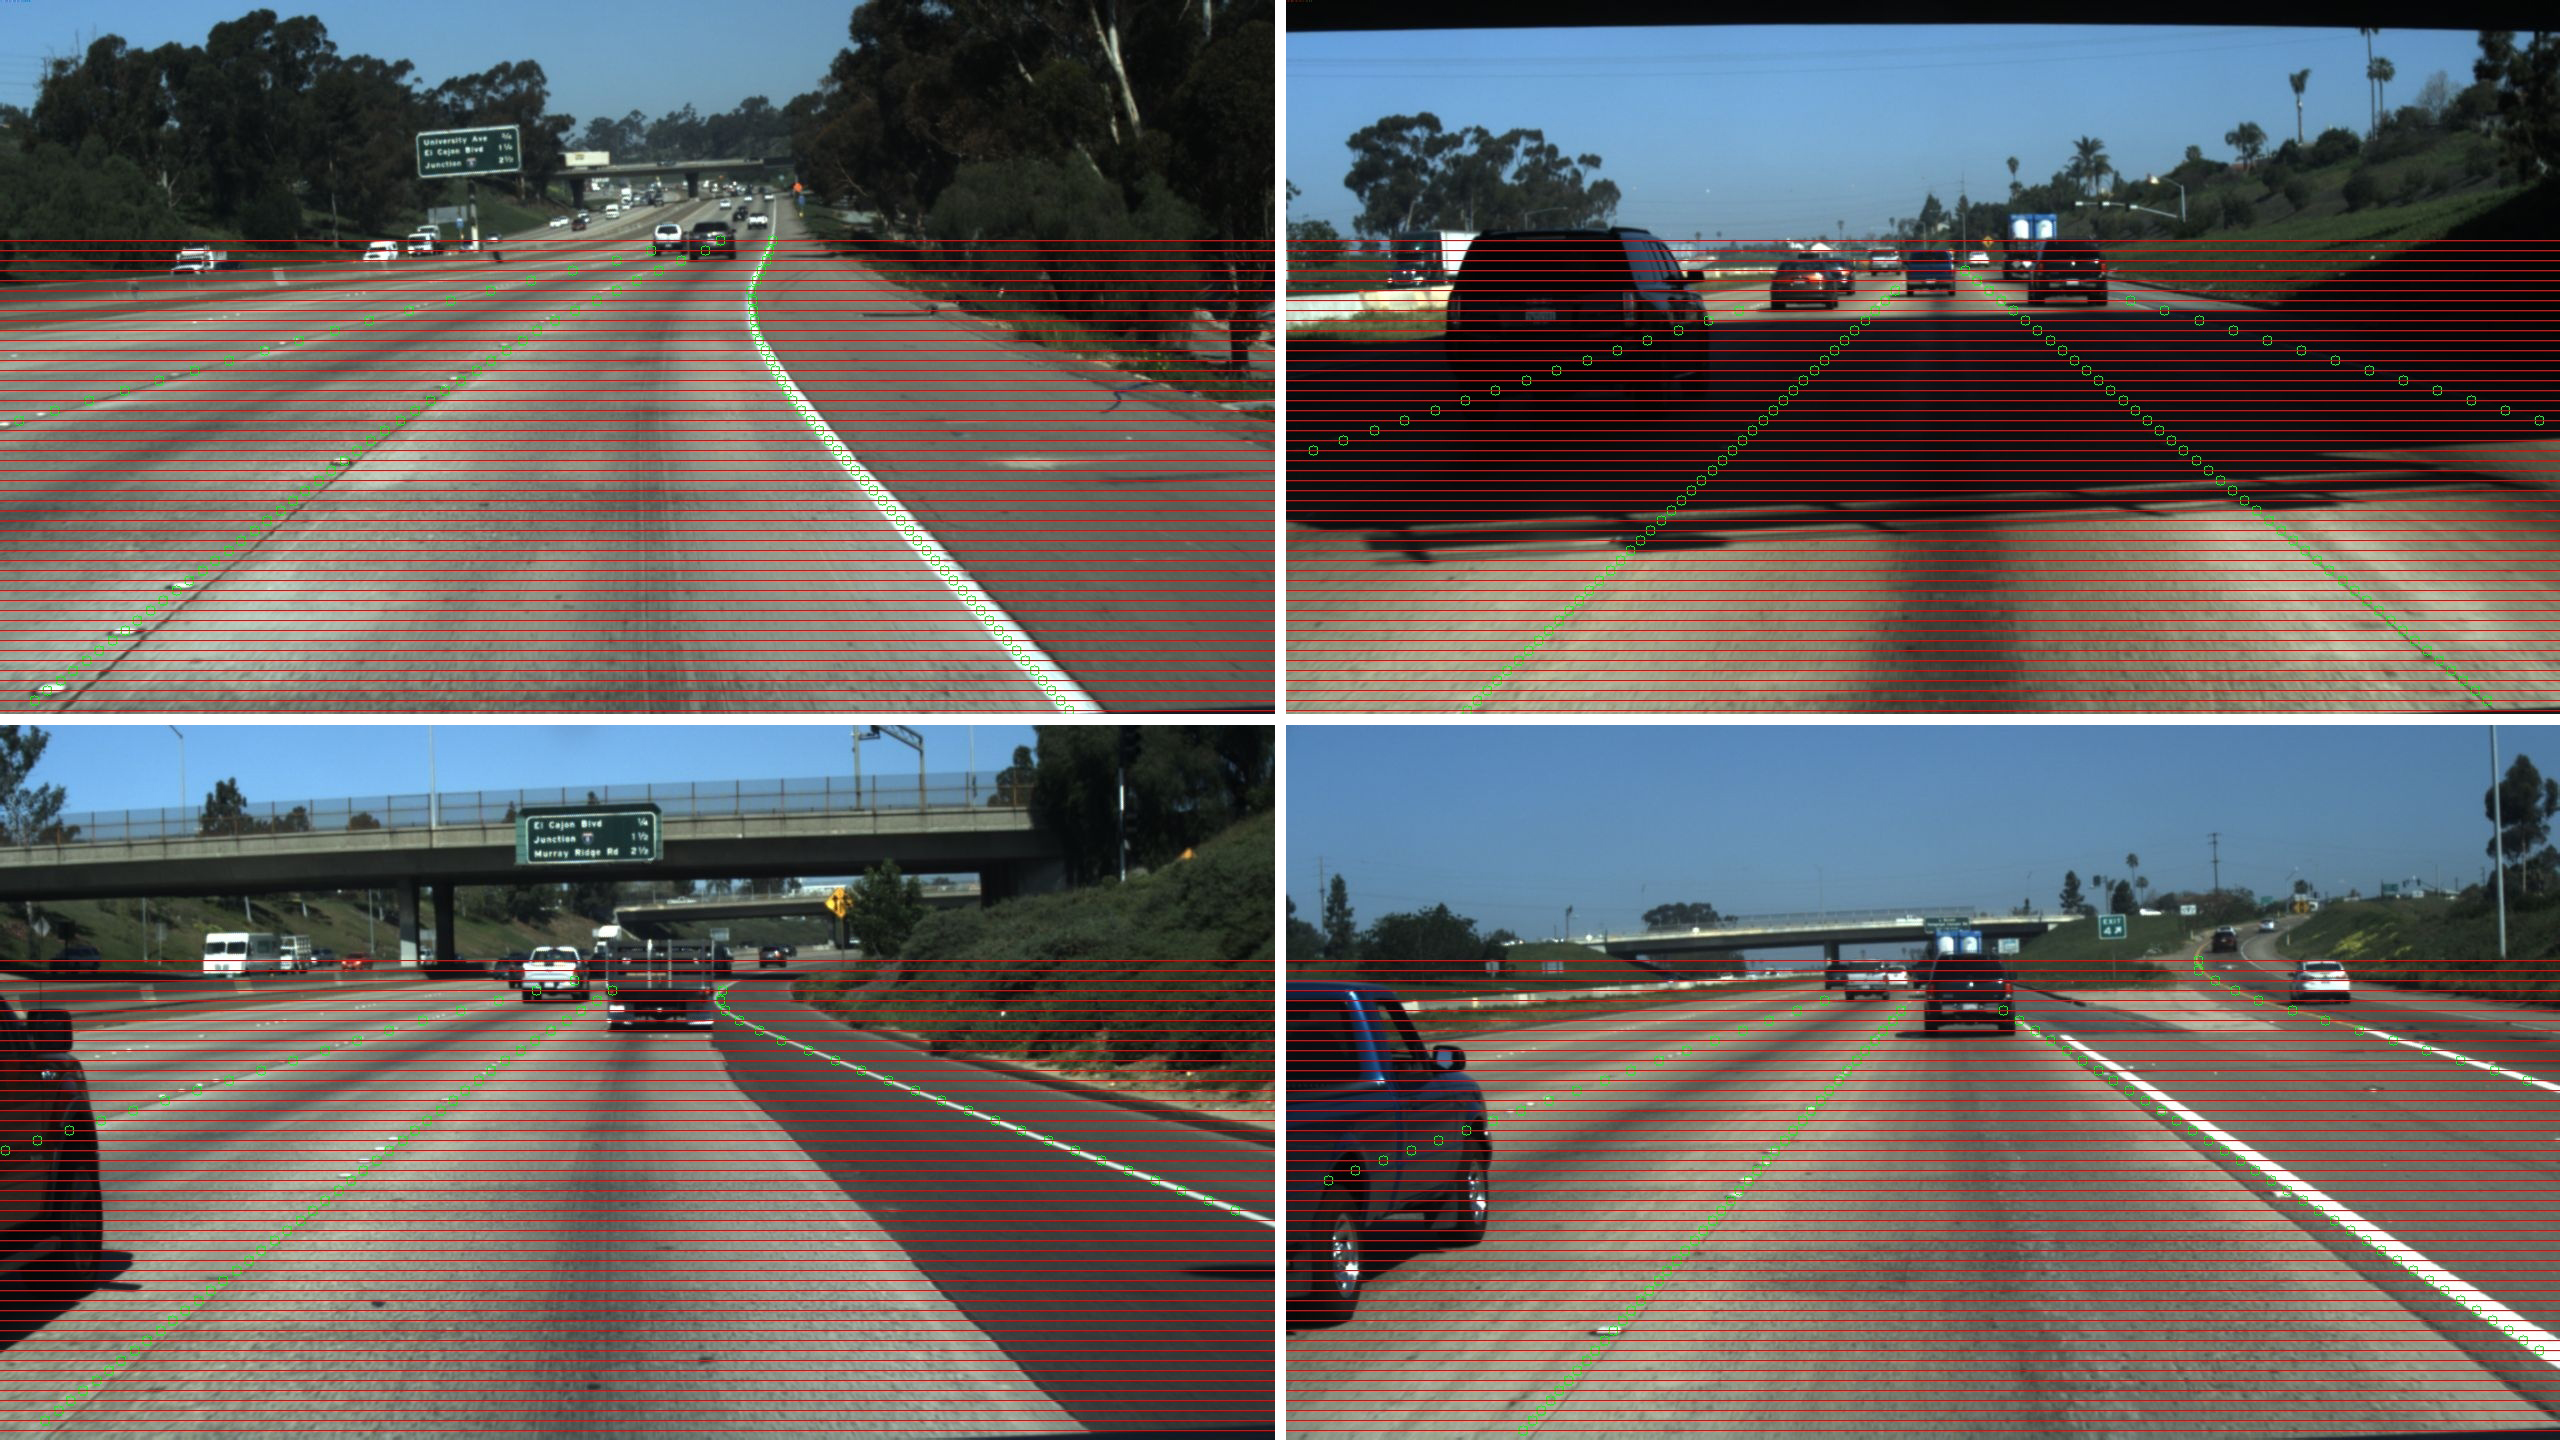
训练数据由三部分组成:原始图像,二进制分割文件和实例分割文件。请同时访问仓库中gt_image_binary文件夹内的gt_image_instance和/data/training_data_example文件夹。
二进制分段使用255表示泳道字段,使用0表示其余字段。该实例使用不同的像素值表示不同的车道字段,其余使用0。
我的问题是如何生成这两个标签(二进制和实例分段文件)?
作者说,您只需要遵循以下位置的Tusimple Lanenet数据集的自述文件中的准则:https://github.com/TuSimple/tusimple-benchmark/blob/master/doc/lane_detection/readme.md
据此,您可以在json文件中使用以下格式生成这些文件:
{
      'raw_file': str. 20th frame file path in a clip.
      'lanes': list. A list of lanes. For each list of one lane, the elements are width values on image.
      'h_samples': list. A list of height values corresponding to the 'lanes', which means len(h_samples) == len(lanes[i])
    }
“ label_data_(date).json”中的每条json行是框架的标签数据。
例如
{
  "lanes": [
        [-2, -2, -2, -2, 632, 625, 617, 609, 601, 594, 586, 578, 570, 563, 555, 547, 539, 532, 524, 516, 508, 501, 493, 485, 477, 469, 462, 454, 446, 438, 431, 423, 415, 407, 400, 392, 384, 376, 369, 361, 353, 345, 338, 330, 322, 314, 307, 299],
        [-2, -2, -2, -2, 719, 734, 748, 762, 777, 791, 805, 820, 834, 848, 863, 877, 891, 906, 920, 934, 949, 963, 978, 992, 1006, 1021, 1035, 1049, 1064, 1078, 1092, 1107, 1121, 1135, 1150, 1164, 1178, 1193, 1207, 1221, 1236, 1250, 1265, -2, -2, -2, -2, -2],
        [-2, -2, -2, -2, -2, 532, 503, 474, 445, 416, 387, 358, 329, 300, 271, 241, 212, 183, 154, 125, 96, 67, 38, 9, -2, -2, -2, -2, -2, -2, -2, -2, -2, -2, -2, -2, -2, -2, -2, -2, -2, -2, -2, -2, -2, -2, -2, -2],
        [-2, -2, -2, 781, 822, 862, 903, 944, 984, 1025, 1066, 1107, 1147, 1188, 1229, 1269, -2, -2, -2, -2, -2, -2, -2, -2, -2, -2, -2, -2, -2, -2, -2, -2, -2, -2, -2, -2, -2, -2, -2, -2, -2, -2, -2, -2, -2, -2, -2, -2]
       ],
  "h_samples": [240, 250, 260, 270, 280, 290, 300, 310, 320, 330, 340, 350, 360, 370, 380, 390, 400, 410, 420, 430, 440, 450, 460, 470, 480, 490, 500, 510, 520, 530, 540, 550, 560, 570, 580, 590, 600, 610, 620, 630, 640, 650, 660, 670, 680, 690, 700, 710],
  "raw_file": "path_to_clip"
}
然后,您只需将点叠加在原始图像上(使用cv2.polylines?)。
我该怎么做?
我试图通过仅在黑色背景上画一条线(用颜料绘制,是的)来创建二进制和实例分段文件。然后出现形状错误,因此将其转换为灰度。我还检查了同样是灰度的原始文件,所以我遵循了这种图像格式。
但是,再次出现错误。
生成二进制和实例分段文件的最佳方法是什么?
答案 0 :(得分:0)
我会在这里放一个答案(不知道回答一个老问题是否很好)。
label = '0601'
labe_filename = 'label_data_%s.json' % label
clips = [json.loads(line) for line in open(labe_filename).readlines()]

for clip in clips:
    lanes = clip['lanes']
    filepath = clip['raw_file']
    ysamples = clip['h_samples']

    lanes = [[(x, y) for (x, y) in zip(lane, ysamples) if x >= 0] for lane in lanes]

    raw_image = cv2.imread(filepath)
    label_image = np.zeros(raw_image.shape[:2], dtype=np.uint8)

    for lane in lanes:
        cv2.polylines(label_image, np.int32([lane]), isClosed=False, color=(255,255,255), thickness=5)

    cv2.imshow("win1", raw_image)
    cv2.imshow("win2", label_image)
    cv2.waitKey(0)
    break
Tusimple数据集使用类似扫描线的形式来形成车道(this)的标记。 h_samples是扫描线的y坐标。因此,您需要结合h_samples和lanes(它们是x坐标)来形成车道标记。而且,如果没有现有的车道标记,则x坐标将为0。这是此行的作用:
lanes = [[(x, y) for (x, y) in zip(lane, ysamples) if x >= 0] for lane in lanes]
例如,对于细分,请为每个泳道使用不同的颜色。您可以参考他们的数据提供者代码来解决形状错误。